
The cropping tool is one of the most valuable and underrated instruments in photography. As it’s fundamental, most amateurs use cropping to ensure the picture fits a set of dimensions. The tool is just as powerful as a storytelling device, and it’s a great way to stand out among other photographers.
How do you crop a photo? This photo crop guide will help you make sure your picture fits for any social media, introduce you to frame rates, and show how cropping can enhance any image.
Introduction to Frame Formats
In a camera, a frame format is defined by the viewfinder. Depending on the type of gear, there are different sizes and ratios the final picture will have.
Digital single-reflex cameras (DSLR) can fall both in the full-frame and crop sensor realm. The image sensor in high-end DSLR gear has a 35 mm format. This value is considered as a small film format.
Considering that smaller image sensors are faster and cheaper to produce, some DSLRs have a format under 35 mm. Using a small frame format was common for older gear — think Nikon NASA F4.
Take a look at the list of standard DSLR frame formats to get a better understanding of how they affect your photos.
1. Full-frame
35 mm is a standard for a ‘full’ frame as it helps photographers achieve the right element balance within the image. The format provides photographers with a broader range of dynamics and a higher image resolution. Using the full frame for landscape and architecture shots is a common industry practice.
The full-frame format makes low-light shooting easier, provides a shallow depth of field, and offers photographers more versatility. However, full-frame cameras are more expensive than crop-sensor gear, so most amateurs can’t afford a 35 mm DSLR as their first gear.
2. Crop-frame
Crop-frame is an alternative to full-frame cameras. The main difference between the two lies in the field of view. A crop camera increases the focal range of the image, grabbing a tighter field of view than a full-frame.
A crop-frame camera is recommended by photography cropping rules to handle most photojournalism tasks or wildlife photography. These are cheaper than a full-frame DSLR.
3. Medium-frame
Medium-format cameras have a considerably larger image sensor than a full-frame one. While there’s no standard size among manufacturers, the consensus is that the format lies between the full-frame and the large-frame dimensions.
Medium-frame cameras offer an impressive color reproduction and a stunning image quality. This type of gear is a common choice for fashion shoots and advertising.
Medium-frame cameras are usually heavier than full-frame or crop-frame alternatives. Thus, preparing for the shoot takes more time, and the photographer’s productivity decreases.
Common Aspect Ratios
The aspect ratio refers to the width (the first number) and the height (the second number) of the screen. Depending on devices the audience uses, there are different aspect ratios:
- 5:4 — a computer screen;
- 4:3 — SDTV;
- 3:2 — smartphones, DSLR cameras;
- 16:10 — widescreen computers, smartphones;
- 16:9 — smartphones, HDTV;
- 1.85:1 — film cameras in the US;
- 2.35:1 — cinemascope.
Here’s a photo cropping guide of all common aspect ratios, the specifics of choosing each, and their respective pros and cons.
1. 4×6 inches
It is the most common photo printing size. If a photographer shoots on a 35 mm DSLR, the output image will meet the aspect ratio. Thus, there’s no need to resize or crop your pictures.
Images set to 4×6 are easy to put into a photo album or carry around — that’s yet another reason to prefer the aspect ratio over others.
2. 5×7 inches
This aspect ratio gives photographers a broader view. Altogether, a 5×7-inch picture will have more clarity and detail than a 4×6-inch one. However, if you want to change a 4×6 picture into 5×7, keep in mind that the left and the right edges of the frame are cropped in the printed version.
3. 8×10 inches
If you want to convert a 2×3-image to the 8×10 aspect ratio, keep in mind that the bottom part of the photo will be cropped, along with the edges to the left and the right. To print an image in 8×10 inches, choose 4×3 as a default aspect ratio — this way, you’ll avoid unnecessary cropping and distortion.
4. 12×18 inches
A 12×18 picture is usually classified as a mini-poster. Similarly to 4×6, the aspect ratio is derivative from 2×3-inch photos, so the 12×18 image will look a lot like the version you see in the camera ‘Display’ mode.
Customizing the aspect ratio requires an excellent editing technique and a dedicated toolkit. Photographers need to steer clear of distortion and ensure a smooth transition between ratios.
Why You Should Crop Images
It is common among bloggers and photographers to post images in their original size without cropping. While photo editing can be time-consuming, there’s more to it than aesthetics. Cropping pictures before posting improves the website’s usability, helps create native social media covers, and increases the quality of the frame.
Take a look at the reasons our portrait photography cropping guide offers in favor of cropping images before printing or posting them online.
- Faster upload time. It takes more time for a JavaScript file to resize images before loading a website page. That’s why cutting the size of the page before uploading it to the server is a way to improve page speed and retain more users on the website.
- Better image display on blogs and websites. Face photo crop rules are a way to ensure they don’t interfere with the main content of the page and don’t take more than one screen on a mobile device.
- To meet social media size restrictions. Cropping helps change the image’s aspect ratio to ensure it displays well on social media since most platforms set custom image size restrictions. Most editing tools offer presets for changing the size of the image from 3×2 to 4×6 or 5×7 — you’ll be able to adjust the aspect ratio in one click.
- Fix composition failures. Finally, cropping helps remove all unneeded components from the frame to focus the viewer’s attention on the eye-stopper of the image. A photographer can remove people from the background, fix an awkward posture, delete an unattractive area, and attract attention to the key points of the frame.
Cropping Tools For Social Media
If you want to ensure your image will not be cropped automatically by a social media platform, take control over the part of the picture, you want to grab attention by using special tools. Take a look at the list of standard image sizes for the most popular social media platforms and the tools for cropping photos.
1. Instagram
Square photo: 1080×1080 px, 1:1 aspect ratio;
Portrait orientation: 1080×1350 px, 4:5 aspect ratio;
Horizontal photo: 1080×1350 px, 1.91:1 aspect ratio.
The following program solutions are widely used to crop pictures for Instagram:
2. Facebook
Profile picture: 180×180 px;
Cover photo: 851×315 px;
Post image: 1200×900 px;
Event image: 1920×1080 px;
Ad size: 1280×628 px.
Common tools for Facebook image adjustment:
3. Youtube
Channel art: 2560×1140 px;
Profile picture: 800×800 px;
Channel thumbnail: 1280×720 px.
To make sure your channel cover is not cropped too much, you can check these resizing tools:
4. LinkedIn
Images in the feed: 1104×736 px;
Image sizes for sharing links: 1200×628 px.
Tools that are used for cropping LinkedIn images so that they fit the standard sizes:
5. Twitter
Cover photo: 1500×1500 px;
Profile picture: 200×200 px;
Images in posts: 1024×512 px;
Images, attached to links: 520×254 px.
If you wonder how to crop images using a specific tool — check the following list of available solutions:
How Cropping Improves Pictures: Before vs After
Even if an image lacks an eye-stopper and doesn’t look appealing or unique, most composition blunders can be fixed by cropping alone. Here are some cropping photography examples that show how to improve pictures by removing unnecessary components from the frame.
Original, not cropped photo
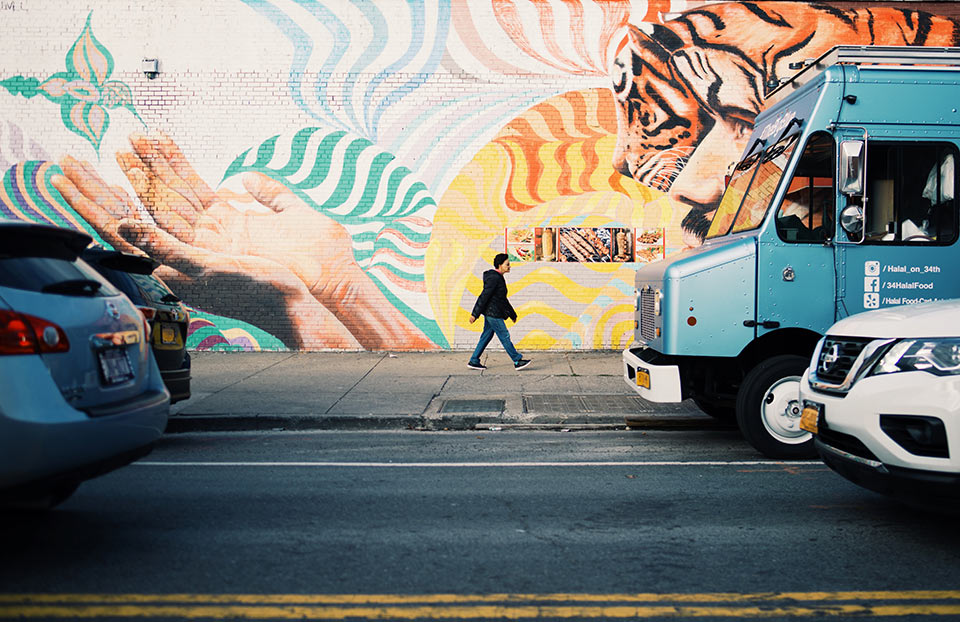
The shot captured an interesting moment, that shows the loneliness of a human in the environment full of autos on the city street art background. The photo has multiple meanings and using crop tool we can extract and highlight multiple ideas of this single photo.
Crop option #1
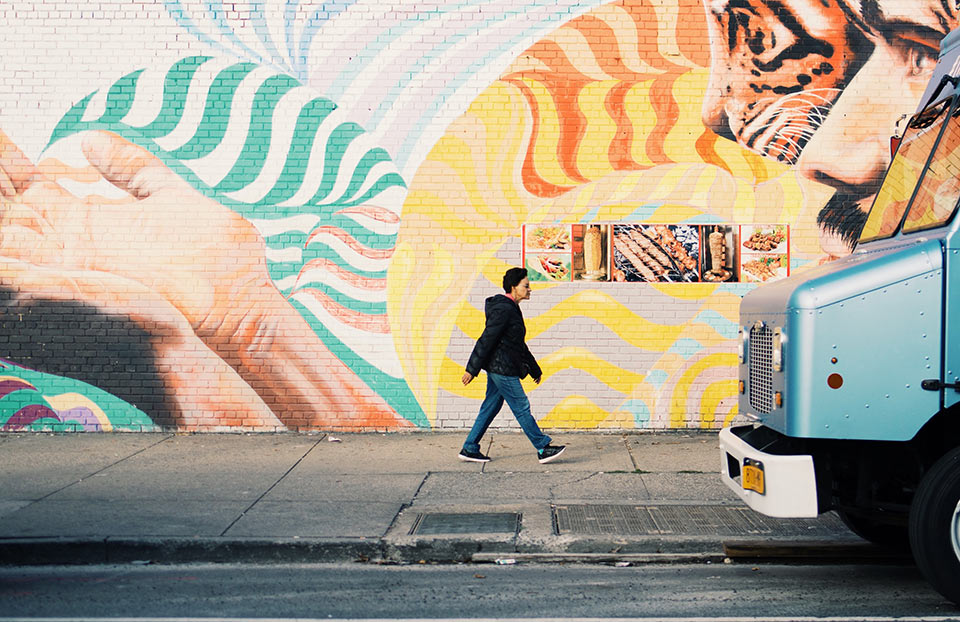
Remove distracting details and emphasize the person and background.
Crop option #2
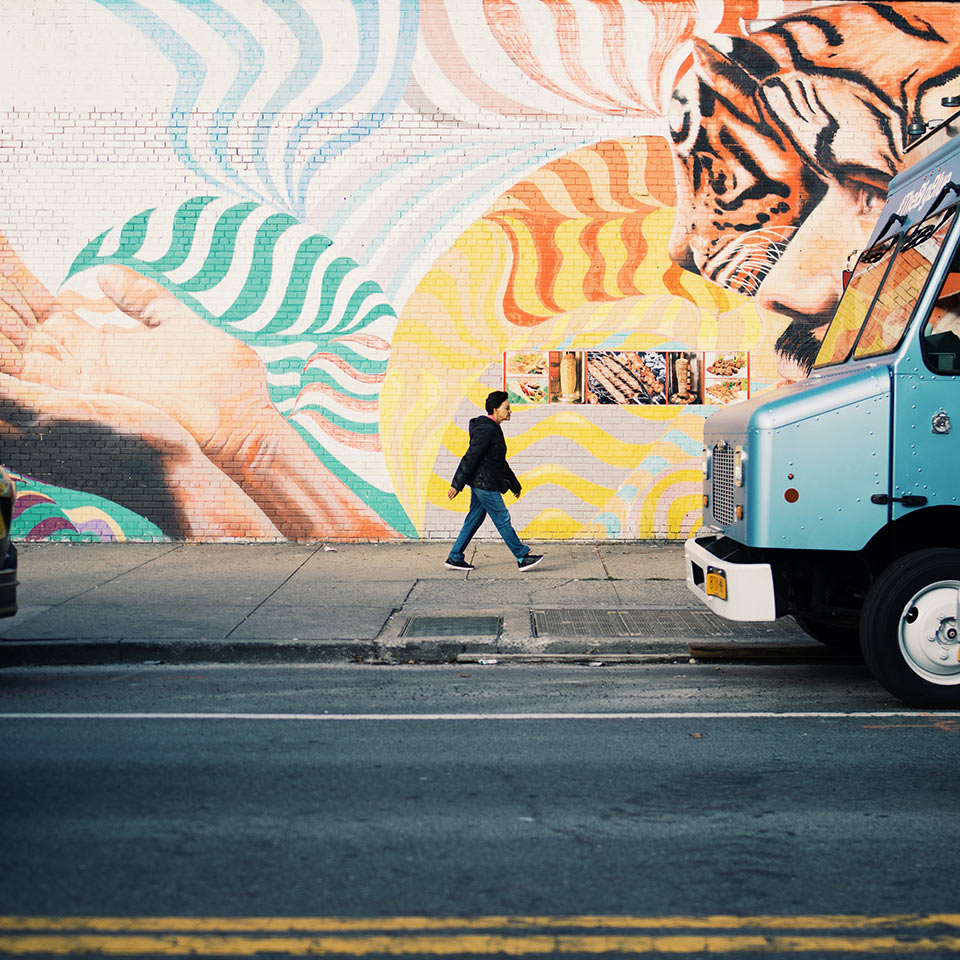
By keeping the depth of view and cropping to a square ratio, we put a person into the central focus point of the frame, giving the maximum attention of a viewer to the central figure.
Crop option #3
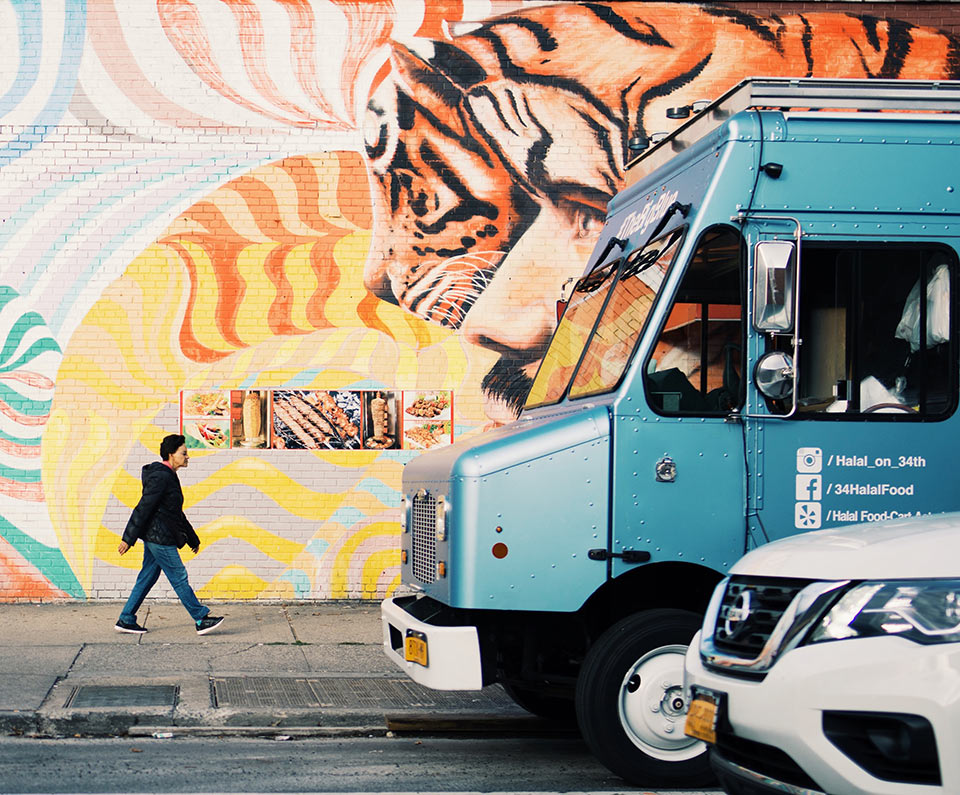
Lets put a human figure into the bottom-left corner and make a leading diagonal line from top-right to bottom-left corners, and such a crop makes a person even smaller compared to a truck on the right side. With this crop, we contrast the tiny human figure to a large truck, giving a feel that a human is small and powerless in the city environment, full of heavy machines.
Conclusion
Cropping, both in-camera and in the post, is a fast way to improve the storytelling value of your picture. It’s hard for photographers to preserve their creative vision fully — a bypasser, a car, or a shadow can get in the way of the frame.
That’s when photography cropping tips and tools come in handy, allowing both amateurs and professionals to de-clutter the picture and make sure nothing in the frame will distract the viewer. There are dozens of photo crop rules that help photographers crop pictures using post-production tools — take your time to find out more about the basics of editing.
Need a Picasa alternative with facial recognition?
Get powerful image organizing and editing software
Find and remove all duplicates, adjust the date and time of photos, tag photos with keywords, recognize faces, and organize images into life events. See all Features of the software.

Computer programming and digital photography enthusiast. Makes programs over the last 20 years. Interested in product design, UX, images processing and digital arts. Works for Lunarship Software and improves Phototheca every day.